What this guide covers
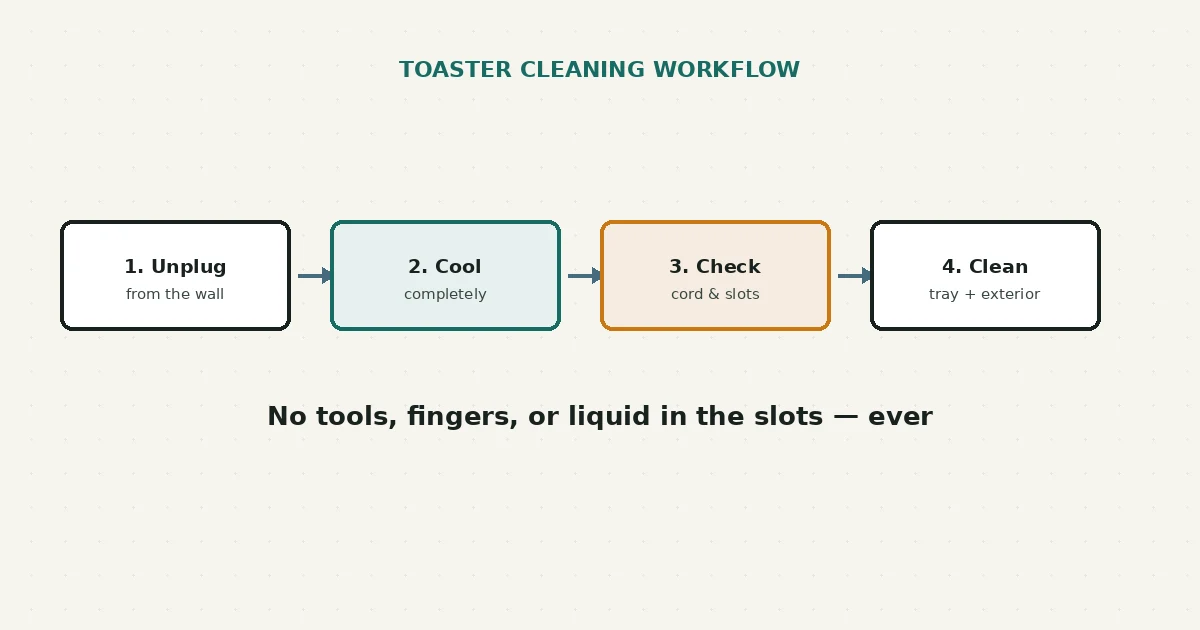
Cleaning a toaster safely comes down to three things in order: unplug it, let it cool completely, and work only with the removable crumb tray and the exterior — never the slots themselves. Manufacturers are direct about this because a buildup of crumbs is a documented fire risk, but the slots and heating elements inside are not a place for tools, fingers, or liquid.
Quick answer
Unplug the toaster and let it cool fully. Slide out the crumb tray, empty it, and wipe it clean, then wipe the exterior with a damp cloth. If crumbs are stuck inside the slots, turn the unplugged, cooled toaster upside down over a trash can and gently shake or tap it — never reach into the slots with a utensil, fingers, or a cloth.
Why this matters
Bread produces crumbs, and crumbs that collect at the bottom of a toaster sit near the heating elements. Manufacturer safety documentation states plainly that failing to clean the crumb tray can create a fire hazard — this isn’t a minor housekeeping suggestion, it’s treated as a real safety instruction alongside things like keeping the cord away from hot surfaces and never leaving the toaster unattended while it’s on.
The routine itself is simple and doesn’t require opening anything. What matters most is doing it on a stable, dry surface, with the toaster unplugged and fully cooled, and keeping cleaning limited to the crumb tray and the parts of the exterior your manual identifies as user-accessible.
It helps to think of a toaster’s design in two parts: the parts you’re meant to reach — the crumb tray and the outside — and the parts you’re not, which is everything inside the slots themselves. That boundary isn’t arbitrary. The heating elements, the carriage that lowers and raises the bread, and the wiring that connects them sit close together in a small space, and manufacturers design the crumb tray specifically so that routine cleaning never requires getting near any of that.
Unplug / cool / check workflow
What crumb buildup and other signs may mean
| What you observe | Possible explanation | Reasonable next step |
|---|---|---|
| Visible crumbs at the bottom, tray not emptied recently | Normal accumulation from regular use | Empty and wipe the crumb tray on the schedule your manual recommends |
| Burning smell tied to toast, fades after tray is cleaned | Old crumbs contacting the heating element | Clean the tray; recheck on the next use |
| Burning or electrical smell that doesn’t fade after cleaning | Not the expected pattern | Unplug and stop using; contact the manufacturer |
| Toast doesn’t pop up or release at the end of a cycle | Possible mechanical issue with the carriage or lifting mechanism | Unplug; do not reach into the slots — contact the manufacturer |
| Sparking or visible arcing when plugged in | Not a cleaning issue | Unplug immediately and stop using the toaster |
These are common patterns to help you decide what to do next, not a confirmed diagnosis — if a burning smell or malfunction persists after basic cleaning, treat it cautiously rather than continuing to use the toaster.
Before you start
- Unplug the toaster and set it on a stable, dry, heat-safe surface.
- Wait until the toaster is fully cool to the touch — this can take longer than it looks, especially near the slots.
- Check your manual for which parts are removable and whether the crumb tray is dishwasher-safe or hand-wash only on your model.
Least-invasive checks and cleaning, in order
- Unplug and let cool completely. Don’t clean a toaster that’s still warm.
- Slide out the crumb tray from the bottom or side, depending on your model, and empty it into the trash.
- Wipe the tray with a clean, damp cloth, or wash it with warm soapy water if your manual allows it, then dry it fully before replacing it.
- Wipe the exterior with a damp cloth. Avoid abrasive cleansers or scouring pads, which manufacturers commonly warn can scratch the surface.
- For crumbs stuck inside the slots, hold the unplugged, cooled toaster upside down over a trash can or sink and gently shake or tap the sides to dislodge them. Do not insert a knife, fork, brush, or your fingers into the slots to try to remove crumbs — manufacturers are explicit that this risks contact with internal heating elements even when the toaster is unplugged.
- Never use water, spray cleaner, or any liquid inside the slots, and never immerse the toaster in water, per standard manufacturer safety instructions for electrical appliances.
- Replace the crumb tray fully before plugging the toaster back in, and confirm it’s seated correctly — some models won’t operate normally, or won’t be as effective at containing crumbs, if the tray isn’t fully inserted.
Maintenance and prevention
- Empty the crumb tray regularly — manufacturer guidance commonly suggests weekly for daily use, though your manual may specify a different interval for your model.
- Get in the habit of emptying the tray as part of routine kitchen cleaning rather than waiting until it’s visibly full.
- Keep the toaster unplugged when not actively in use, which several manufacturers list as a standard safety practice, not just an energy-saving tip.
- Keep the area around the toaster clear of paper towels, curtains, or other flammable items, and leave clearance on all sides per your manual’s guidance.
- If you toast a lot of items that shed more than typical bread — bagels, English muffins, foods with seeds or toppings — consider emptying the tray more often than your baseline schedule, since these tend to add crumbs and debris faster.
Outside what this guide covers
This guide covers the removable crumb tray and the exterior surfaces your manual identifies as user-accessible. It does not cover the toasting slots’ interior, the heating elements, the carriage or lifting mechanism, or any internal electrical component — those are not designed to be cleaned, adjusted, or repaired by the owner. If toast repeatedly fails to release, if you notice a persistent burning or electrical smell, or if you see any sign of damage beyond ordinary crumb buildup, that’s a reason to stop using the toaster and contact the manufacturer rather than attempting a fix inside the housing.
FAQ
How often should I clean the crumb tray?
Manufacturer guidance commonly suggests weekly if the toaster is used daily, but check your own manual, since this can vary by model and by how much you use it.
Can I put the crumb tray in the dishwasher?
Some models allow this and some don’t — check your manual rather than assuming, since dishwasher heat and detergent can affect some tray finishes.
Is it okay to use a vacuum with a narrow attachment on the slots?
Follow your manual’s guidance on this specifically; some manufacturers describe shaking or tapping as the recommended method and don’t address vacuum use, so it’s best not to assume it’s approved for your model.
Why does my toaster smell like burning the first time I use a new setting?
A brief odor from any dust or residue on a rarely used setting can happen, similar to other heating appliances used for the first time at a new temperature. If the smell doesn’t fade quickly or seems like more than a faint, brief odor, treat it as a signal to stop and check the toaster rather than continuing.
Related checks
If you’re setting up a few new countertop appliances at once, the air fryer odor guide covers a similarly cautious approach to a different first-use concern. And if a coffee maker in the same kitchen is brewing slower than it used to, this coffee maker guide walks through a comparable clean-first, least-invasive process.
New to RFSE? See how to approach any RFSE guide safely, or browse the full Kitchen Equipment hub for more guides like this one.
Sources
This guide is based on official manufacturer use-and-care documentation current as of publication. Crumb tray design, cleaning schedules, and dishwasher-safe status vary by model — always confirm details against your exact toaster’s manual.